Customise your app through the configuration files (JSON)
If you’ve already tried customising your apps through the App Builder or by using the App Options but are looking for a bit more, then your next step would be to change the app configuration files.
This kind of app customisation can be done for all app types (Map Viewer, Map Editor, Map Portal), and can be used in combination with other methods listed before.
You will first need to prepare your app for customisation, then choose the configuration file, and lastly connect any additional files if needed (such as CSS, or JavaScript).
1. Prepare your app for customization
The first step is to change the default configuration file of the app to a custom one. To do so, follow these steps:
- Open GIS Cloud Manager and scroll down to the Custom Apps section.
- Find the app you would like to customize and click on the Edit button.
- In the App Instance window click on the Advanced tab, and then click to Create app folder. This folder is where you will put all your customization configuration files.
- After the folder has been created, click on Open app folder
- You will see an empty folder in Source Browser, so the next step is to add the configuration file.
If you have already made some changes to your custom app, it’s possible you’ll already have an app folder and an app.json file, so you can simply skip this step and continue on to the configuration stage. You could either replace the app.json completely, or just edit the existing one.
Note: If you’re replacing the existing app.json file, make sure to create a copy if you’d like to return to the original state. Also, do not rename the default app folder name, or delete it. Deleting the folder will not delete the app, but it will delete any configuration changes you’ve made, so the app will default to the original state.
2. Choose a configuration file and prepare it for customization
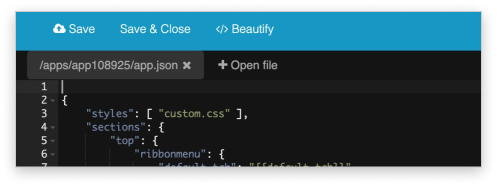
In Source Browser, click on Create new file to add a file named app.json. Once you created a new file, click on it and open it by clicking the Edit text file tool. The file will open in an online text editor, but it will be empty, so it is necessary to fill it with the default configuration.
However, the default configuration is dependent on the app that you want to customize. So, copy the config file from the following links depending on if you are creating a custom Map Editor, Map Viewer or Map Portal. Paste the text into the app.json you have opened in the online text editor. Click on Save&Close. Everything is now ready to be customized.
From here, you can edit the JSON file. Remove or add buttons, change the button icons, change the order of the tools – the possibilities are endless. For example, if you don’t want users accessing your custom app to use the Clone and Merge tools, you can simply remove them from the app.json file. Instead, you might choose to add your own tools!
Top tip! Using this method, you can also use the Map Portal app.json configuration to create a Map Editor or Map Viewer app with a completely different interface. This is a great option for Map Viewer, as it still keeps it private (behind a login screen), but allows you to use tools from the app builder (which can be accessed when an app has the Map Portal app configuration).
Add a custom CSS file to your app (optional)
If you’re looking for additional customisation options, you can add your own CSS file, or add some functionality with custom javascript.
- In Source Browser create a new file and call it custom.css (just an example, you can call it however you want)
- Select the app.json file and click on Edit text file to open it in the online text editor
- To set up the app to load custom CSS files, we use the styles section of app.json. Add the styles section to the beginning of the configuration – “styles”: [“custom.css”],

Make sure not to forget the quotes, brackets and comma. In the end click on Save. Adding custom.css to the styles section will ensure the app loads it together with the rest of the source code. While you are still in the online text editor, click on Open file and select your custom.css. The file is empty, so make sure to copy your CSS code and paste it into the text editor. Lastly, click on Save.
Take a look here to see how we used this guide to set up a custom pop-up window!
