Supported customization options
In this guide, you will learn how to customize your app’s appearance and functionalities using our custom options. There are three types of options you can build into your GIS Cloud apps:
Table of Contents
APP OPTIONS
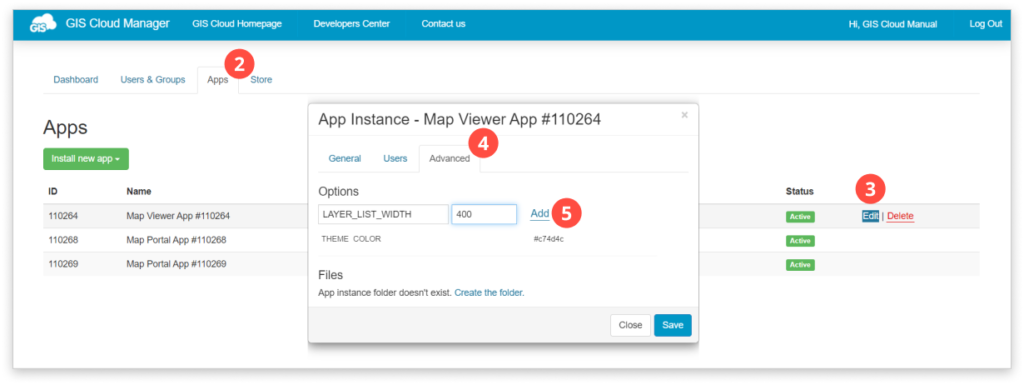
App options are used to personalize your custom apps. To add custom app options, please follow these steps:
- Log in to GIS Cloud Manager.
- Scroll down to the Custom apps section.
- Hover over the app you want to customize and click Edit.
- Open the Advanced tab.
- Choose the option from the table below and write the option name, value and click Add.
- Save changes.
Take a look at one of the custom app options in action here, or try one of the options below!
| Option name | Value | Description |
| DEFAULT_MAP_ID | Number – <map id> | Setting the default map to load at the beginning |
THEME_COLOR | Hex color code | CSS color definition for the main app theme, e.g. for dark red >> #8b0000 Note: We don’t recommend white (the top ribbon buttons won’t be visible) |
| THEME_HOVER_COLOR | Hex color code | Only Map Portal: Hover color of buttons in the top ribbon |
| LOGIN_PAGE_ONLY | 0 or 1 | Show only login page if the user is not logged in |
| LOGIN_PAGE_LOGO_URL | String – URL, or path to the file in File Manager | URL to a custom logo on the login page, or path to the file in your account, eg. /logos/main-logo.jpg |
| LOGIN_PAGE_LOGO_LINK | String – URL | Setting a custom logo link (on the login page) e.g. https://www.giscloud.com |
| LOGO_LINK | String – URL | Setting a custom logo link (inside the app) e.g. https://www.giscloud.com |
| LOGIN_PAGE_HIDE_APP_TITLE | 0 or 1 | Hide the title of the map on the login page (under the app logo) |
| MODULE_LOGIN_BOX | 0 or 1 | Only Map Portal: Set the Log in box visible; when logged in allows access to My Account window. By default, the value is 1 |
| MODULE_SSO | 0 or 1 | Enable or disable social SSO (Single sign-on) on the login box like Google, Facebook, LinkedIn and Twitter. |
| DISABLE_MY_ACCOUNT | 0 or 1 | Remove the “My Account” link from the user menu. Used when you want to prevent your users from changing user credentials. |
| BLOG_HIDE | 0 or 1 | Hide blog&video sections on the homepage |
| HOMEPAGE_MAPS | all,my,shared,public,archived | Defines which maps (tabs) are visible on the Homepage |
| HOMEPAGE_MAPS_ACTIVE | all|my|shared|public|archived | Default active maps tab (choose only one) |
| TOOLBAR_ELEMENTS | String – e.g. search,togglemenu,layerlist, currentlocation, zoom,zoomin,zoomout, viewall,select,info,measure, selectarea,print,coordinates, streetview,scale | Choose which Toolbar buttons you want to see in the app. Separate them with a comma “,” |
| MODULE_DATAGRID | 0 or 1 (default) | Show Datagrid |
| MODULE_SEARCH | 0 or 1 (default) | Show Search in the Toolbar |
| MODULE_GISCLOUD_SEARCH | giscloud,google | Display GIS Cloud search, Google maps search or both |
| LAYER_LIST_EXPAND_ALL | 0 (default) or 1 | Expand all folders in the layer list by default |
| LAYER_LIST_OPEN | 0 (default) or 1 | Show layer list by default |
| LAYER_LIST_WIDTH | Number (pixels) | Sets layer list width, default = 300 |
| LAYER_MODULE_BUTTONS_HIDE | 0 or 1 | Hide toolbar buttons in the layer list |
| FORCE_INFO_WINDOW | 0 (default) or 1 | Force to always use info window popup |
| SHOW_MAPS_FROM_OTHER_APPS | 0 or 1 | Add maps to a custom app instance |
| RESOURCE_LINKING | 0 or 1 | Link file to a feature |
| EXPORT_MAP_SCALE | x1, x2, x3, 1000, 5000, 10000, … | Predefined map scale on the map export |
| OPEN_LINKS_IN_NEW_WINDOW | 0 or 1 | Force to open all the attachments in the new window/tab. |
| DATAGRID_FILTER_BY_EXPRESSIONS | 0 or 1 | Show in the Datagrid panel only values that match layer expressions (if defined). |
| DATAGRID_2 | 0 or 1 | BETA: Add the new datagrid to a custom app. Learn more about the new datagrid in the release notes (HERE) and guide (HERE). |
MAP OPTIONS
To install custom map options follow the instructions below:
- Log in to Map Editor.
- Open the map you want to customize.
- Open Map Properties.
- Open the Map Options tab.
- Choose the option from the table below, write the option name, value and click Add.
- Save changes.

| Option name | Value | Description |
| DEFAULT_SELECTED_LAYER_ID | Number – <layer id> | Setting the default selected layer in the layer list |
| SEARCH_FIELDS | {“layer_id”: [“layer attribute”], …} | ONLY WORKS FOR DB LAYERS! Instruct the search engine to search inside specified layers and attributes. More info in this guide. |
| RESULT_FIELDS | {“layer_id”: [“layer attribute”], …} | ONLY WORKS FOR DB LAYERS! What attributes will be shown inside the search results. More info in this guide. |
| MEASURE_UNIT_PROJECTION | E.g. 3765 | Defines default projection for Measurement tool |
| HIGHLIGHT_COLOR | 0xhexcolorcode, e.g. for red >> 0xff0000 | Defines color of selected features |
| LAYER_LIST_WIDTH | Number (pixels) | Sets layer list width, default = 300 |
LAYER OPTIONS
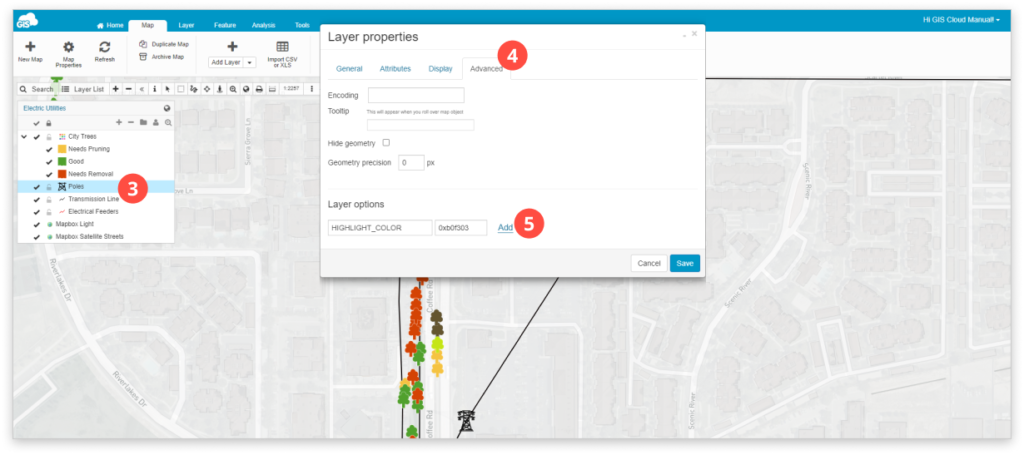
To install custom layer options follow the instructions below:
- Log in to Map Editor.
- Open the map you want to customize.
- Double-click the layer you want to add the option to.
- Open the Advanced tab.
- Choose the option from the table below, write the option name, value and click Add.
- Save changes.
| Option name | Value | Description |
| HIGHLIGHT_COLOR | 0xhexcolorcode, e.g. for red >> 0xff0000 | Defines color of selected features |
| SUPPORT_INCOMPLETE_TILE_COVERAGE | 1 | Dynamically determines the maximum zoom level for each tile request – for TMS with a different number of zoom levels on certain tiles |