Form option
After defining MDC settings and choosing form or layer, tap on the Form button, and start collecting data. Populate fields with data and tap Send button.
Collected data will be visible in the Mobile Data Collection Portal and Map Editor.
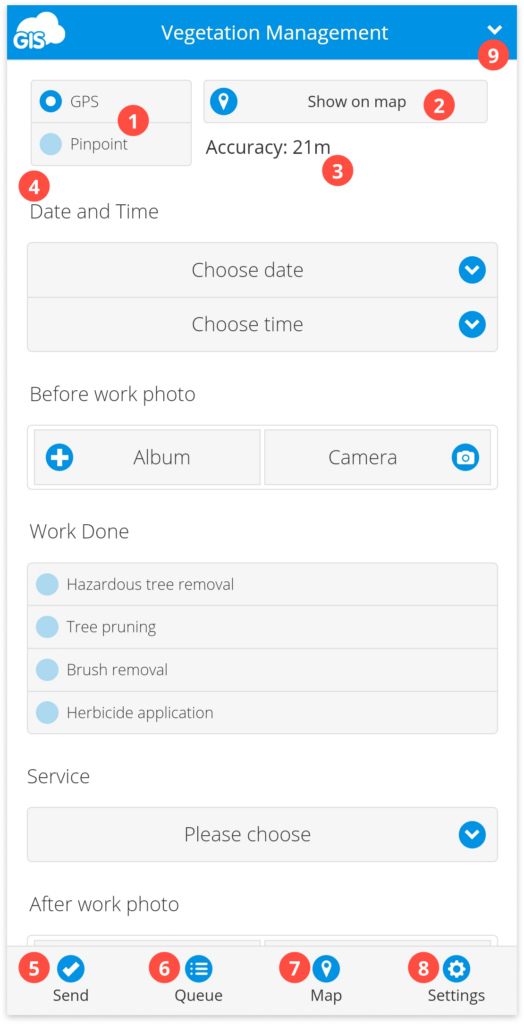
- GPS/Pinpoint – locate the mobile device using GPS or Pinpoint.
- Note: The location accuracy will depend on GPS precision on the mobile device and satellite availability. To define location more accurately, use the Pinpoint tool.
- Show on the map – show the current location of the user on the map.
- Accuracy indicator – shows the precision of GPS location.
- Form fields – populate the fields with data.
- Send – send the data to your map or project.
- Queue – pending data before it is sent to the map or project.
- Note: If you delete data from the Queue, it will not be sent, and the data will be lost. If you are collecting data in Offline mode, then the collected data will be first sent to the Queue and then re-sent to the servers when you are back online.
- Map – view and edit collected data on the map. Find more info here.
- Settings – set general MDC settings. Find more info here.
- Switch Project/Layer – In case you are working on a project created in Mobile Data Collection Portal, click on the arrow to switch to another project. In case you are working on a project created in Map Editor, click on the arrow to switch to a different editable layer from that project.
Note: When switching layers using the arrow button in the top right corner, data collectors will only see the layers where they have the “can collect” permission, project owners will see all layers. Collectors should use the Map button to open the map and access the layers where they have the “can update” permission.
Learn more about collecting data with MDC app in our user guide.