WMS as data source
Web Map Service is a standard protocol for serving georeferenced map images over the Internet. A map server generates images from a GIS database and serves the map in a bitmap format (e.g., PNG, GIF, or JPEG), while vector data can be included as an addition. WMS can also be added from an external source to the map.
Web Map Service, just like the other web services, may be accessed through the Datasource Manager.
Table of Contents
Adding WMS sources to GIS Cloud
To add WMS into the Datasource Manager:
- Select the Datasource Manager from the Tools tab.
- Click Add WMS in the Source Browser.
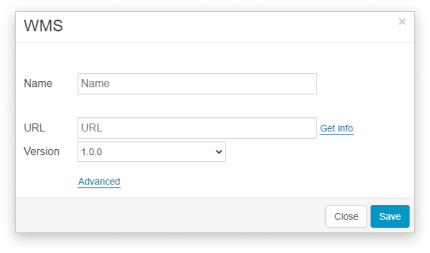
- Write a WMS name and URL of the dataset.
Note: in the WMS URL, delete a part from the question mark to the end of the URL e.g.,
original: http://wms.ess-ws.nrcan.gc.ca/wms/toporama_en?VERSION=1.1.1&request=GetCapabilities&service=wms
modified: http://wms.ess-ws.nrcan.gc.ca/wms/toporama_en
- Click the Get Info button.
- Select one of the available WMS versions (1.0.0, 1.1.1 or 1.3.0)
- Click Save and add a WMS to the map.
Adding WMS layers to the map
WMS is added to a map as shown below:
- Select Add Layer from the Layer tab or Map tab.
- Select Web Feature Service in the Source Browser.
- Select WMS from the Source Browser and select the WMS sublayer.
- In the bottom left corner, choose the projection in which the WMS data will be displayed on the map. If you want to use a basemap (Mapbox, Bing, OSM, etc.) on the map, you must adjust the projection to EPSG:900913.
- Click the Select button.
Add password-protected WMS
It is possible to add password-protected WMS layers in GIS Cloud, but it has to be organized in a way the system can recognize them. The username and password have to be included in the WMS URL and saved in the GIS Cloud Source Browser.
- Open Map Editor and Source browser.
- Click add WMS.
- In the URL box, add WMS URL together with username and password. The URL has to have a structure like this:
- http://username:password@wms_url_example.com
- “username” username of the user who has access to WMS
- “:” delimiter
- “password” password of the user who has access to WMS
- “@” delimiter
- “wms_url_example.com” URL of the WMS
- Example of the password-protected WMS: http://test:12345@wms.ess-ws.nrcan.gc.ca/wms/toporama_en
- Click the Get info button.
- Save the layer and add it to the map.
Apart from adding a WMS to your map, you can share your GIS Cloud map on a third party software as a Web Map Service (WMS).
Troubleshooting
In case you’re having trouble adding your WMS as a source or as a layer to the map, you can check the following:
Do you have the correct URL?
If you’re getting an “Error: WMS is not valid.” message, it’s possible you’re using the incorrect URL form. Make sure that everything that comes after the question mark (?) in the URL is removed, and then try connecting to the WMS again. You can also check with the WMS provider in case they have any specific instructions.
Here is an example of the original URL: http://wms.ess-ws.nrcan.gc.ca/wms/toporama_en?VERSION=1.1.1&request=GetCapabilities&service=wms
versus the modified URL version: http://wms.ess-ws.nrcan.gc.ca/wms/toporama_en
Is the WMS version you’re trying to add supported?
When adding a WMS to GIS Cloud, you can choose between three different versions – 1.0.0, 1.1.1 or 1.3.0. However, your WMS might not support all three versions, so it’s important you choose the correct one. For some WMS, by adding ‘?request=getcapabilities’ (without quotation marks) to the end of your URL and opening this in your browser, you can find out more about supported versions, projections, available layers, etc. Search for a list of versions (or just individual versions), and choose that one in the GIS Cloud modal window.
What projections does your WMS support?
Not all projections are defined for every WMS you use. This depends on the WMS provider, and the list of supported projections can vary from just one to a very large selection. For some WMS, by adding ‘?request=getcapabilities’ (without quotation marks) to the end of your URL and opening this in your browser, you can find out more about supported versions, projections, available layers, etc. Supported projections will be listed like this: <CRS>EPSG:4326</CRS>. Then, when adding the WMS to the map, make sure to choose one of those projections.
Note that if you want to have both the WMS and the basemap on the map, the projection should be set to EPSG:900913. Your WMS needs to support this, so it’s possible you’ll need to remove the basemap in order to use the WMS. The system will prompt you to remove the layer in that case.
In case the EPSG:900913 projection is not available for your WMS, you can set the EPSG:3857 projection (if it is available), and you will be able to use the WMS and basemaps.
Are the bounds correct?
If you’re able to add the WMS to the map and you’re not receiving any errors in the process, but you’re still not able to see the features on the map, it’s possible that this is a bounds issue. More specifically, it’s possible that the features are actually located outside of the calculated bounds for that layer.
You can resolve this by manually changing the bounds (for example to 9999999, if you do not know the correct ones), or by reinitializing the map and/or layer. This issue is not specific to using WMS or WFS, but it’s worth mentioning as it is a good step in troubleshooting.
Reinitializing the map and layer.
If you’re not getting any error messages and you’re able to add the WMS as a layer to the map, but cannot see the features, and in case this WMS works on another map, you can try reinitializing the map and/or layer.