
Forms Manager
Forms Manager tool can be found under the Tools tab in the Map Editor app. Its purpose is to enable creating and defining Mobile Data Collection forms. Pressing the Forms Manager button opens the Form Manager options window.
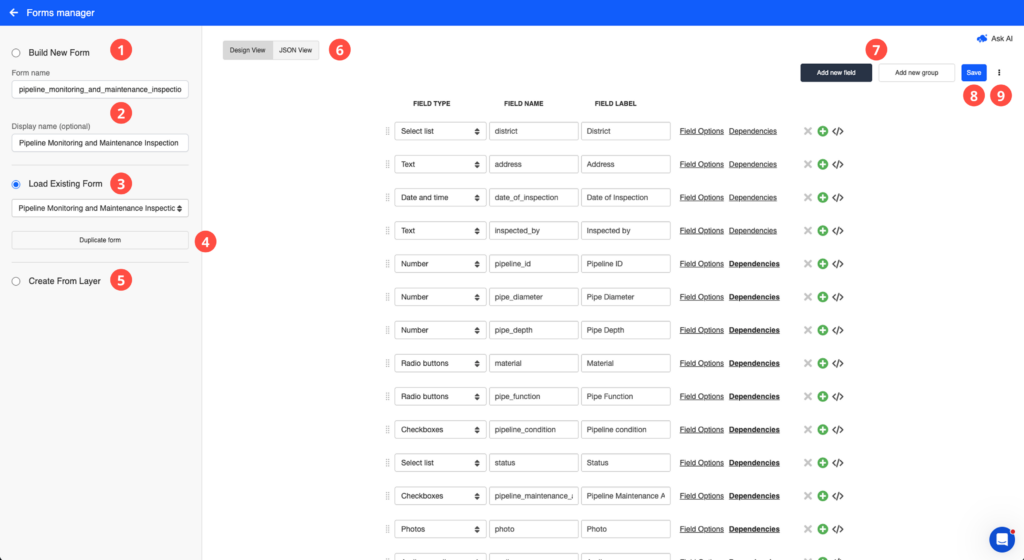
Forms Manager options:
- Build New Form – Select this to define a form from scratch.
- Form name / Display name (optional) – Form name is the technical name of the form. Display name is optional and is what’s shown to Mobile Data Collection users.
- Load Existing Form – Load an existing form from the dropdown menu to make changes to it.
- Duplicate form – Use this if you want to make changes to an existing form while keeping the original structure intact.
- Create From Layer – Automatically adds fields with the same definitions as the layer currently in your map. Note: the form is not automatically connected to the layer when created this way — it’s still necessary to connect the form and layer afterward. Layers must also be added to the map from the Database for this option to be available.
- Design View / JSON View – Switch between the visual form designer and the form’s raw JSON.
- Add new field / Add new group – Add a new field to the form (learn more about form items and their functionalities), or group fields together using “Add new group.”
- Save – Saves the form.
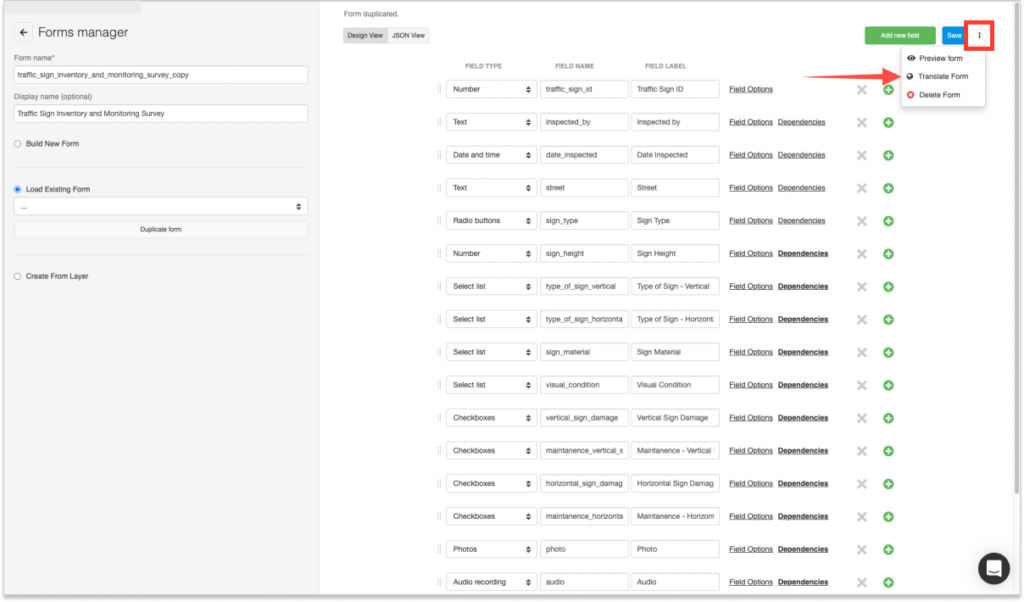
- ⋮ menu – Preview form, Translate form, and Delete form.
Each field in the form has the following options:
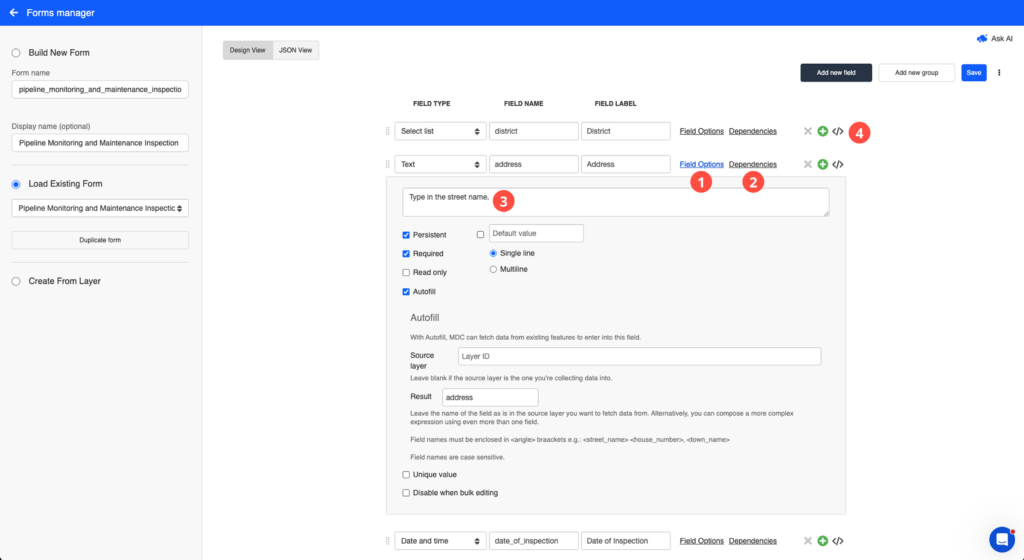
- Field Options – click to open additional settings for the field:
- Description – optional help text shown to the user
- Persistent – remembers the value from the previous submission
- Required – submission can’t be sent unless this field is populated
- Read only – collectors can only view the value, not edit it
- Default value – pre-fills the field with a set value
- Single line / Multiline – for Text fields, choose single- or multi-line input
- Autofill – auto-populates the field from existing data; checking this opens further Autofill settings (source layer, result expression)
- Unique value – requires the field’s value to be unique; checking this opens further settings
- Disable when bulk editing – excludes this field from bulk edit operations
- Dependencies – opens the dependent fields setting; dependent fields will appear in the form if the rules you set are satisfied.
- Description (example) – the help text entered for this field, e.g. “Type in the street name.”
- Delete / Add / Jump to JSON – the X, +, and
</>icons on a field row: delete this field, add a new field, or jump to this field’s entry in the JSON view.
Form translation
You can use the Form Translation feature to translate the forms for your Mobile Data Collection projects. The Form Translation is available through the Mobile Data Collection Portal and can also be accessed from the Map Editor.
When accessing from the Map Editor, Go to the Tools tab and select Forms Manager.
When you’re in the Forms Manager, create a new Form or simply load or duplicate an existing one. Form Translation is accessed as shown in the screenshot below.
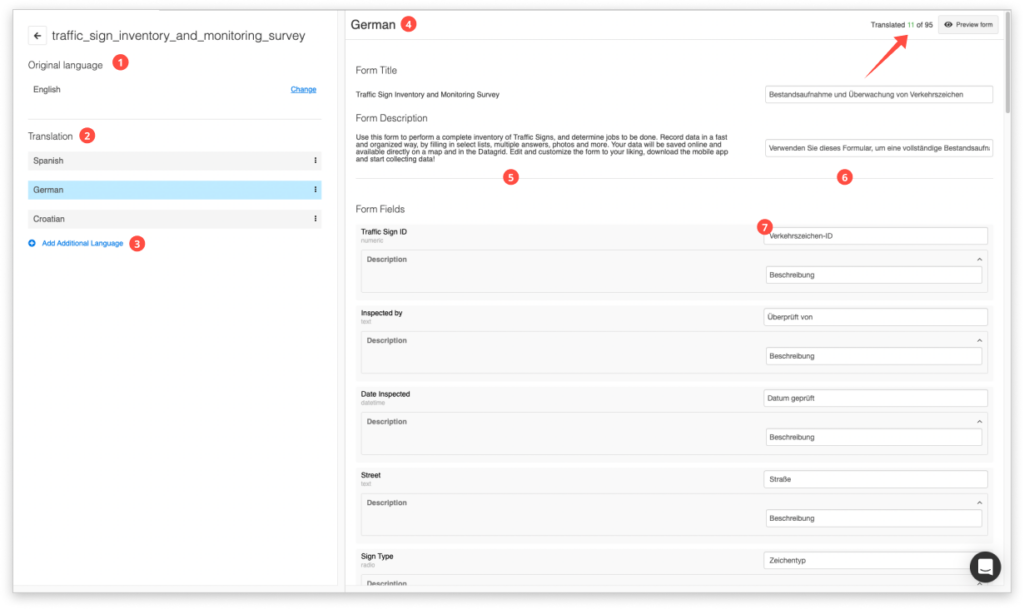
Shown below are additional translation options in Forms manager.
- Original language – here you define the original language of your MDC form
- Translation – Here you choose the language into which you want to translate your form
- Add additional language – Adds one more language into which you can translate your form, one form can be translated into however many languages you need
- The selected language you are currently translating to.
- The MDC form in its original language
- The translated version of your MDC form
- Enter translation – dialogue/text boxes in which you enter your translation.
Learn more about creating forms in Map Editor for data collection in this guide!
After that, you can take a look at our guide on collection of data with MDC app.