How to change the projection of the map?
Every spatial dataset has its own projection, making it possible to display the coordinate system and data on a flat surface. For example, it can be a piece of paper or, in our case, a digital screen. In GIS Cloud, you will find more than nine thousand projections. That means you will surely be able to find a projection suitable for your data.
In this guide you will learn how to:
Change the projection of the map
To display your data precisely and get more accurate results, you can change the projection of the map you are working on. The process is simple, but it is important to note that projection is only possible to change if there is no basemap on the map.
However, if the basemap is added on the map, then the layers will automatically reproject to the projection of basemap (WGS 84 / Pseudo-Mercator).
To set the local projection on your map, follow these steps:
- Log in to Map Editor with GIS Cloud credentials
- Open the map you are working on
- If you have one, remove the basemap from the Layer List
- Click on Map Properties and navigate to Advanced tab
- Click on a projection that is currently used and select the new one from the list or search for a projection through the projection form. In the projection form, you can search for projections using name or EPSG number.
- Select the projection that you would like to use and hit Save.
Change the projection of the layer
Every individual layer has a projection, and it needs to be defined in order for your data to be displayed correctly. This projection can be changed, so the data is precisely displayed in a particular area.
This is especially important when using length and area attributes so that the values can be displayed in correct units. For example, if the projection uses meters, then the values displayed in the data grid will also be in meters.
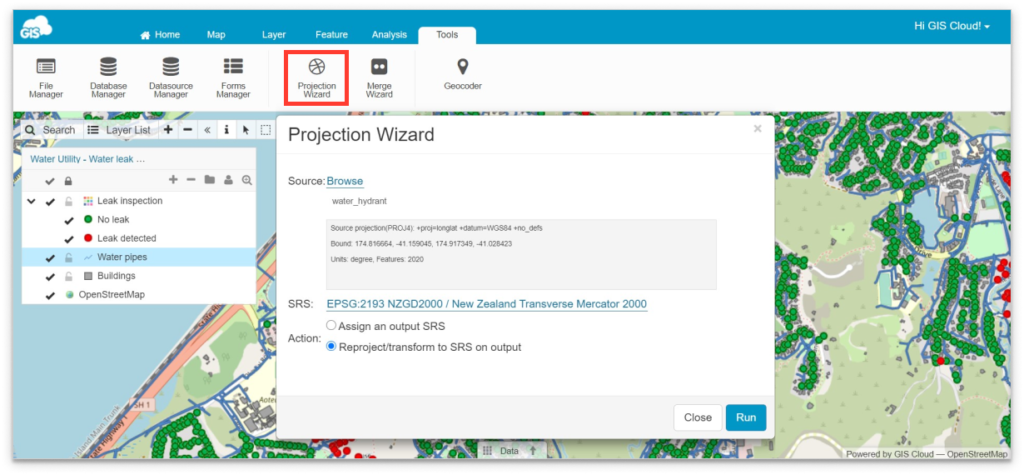
The projection of the layer in GIS Cloud can be changed with Projection Wizard, so just follow these steps:
- Log in to Map Editor with GIS Cloud credentials
- Open the map you are working on
- In Tools tab select Projection Wizard
- Browse to select a layer for which you want to change the projection
- Search and select new projection from the list or use projection form. In the projection form, you can search for projections using name or EPSG number.
- Choose Assign an output SRS if the layer has no projection. If you wish to transform datasource from an existing projection to the newly selected one, choose Reproject/Transform to SRS on output.
- Hit Run.
You have successfully changed the projection of the layer. To get the best results, we suggest changing the projection of the layer and the map to the same projection.
For more information on projections, feel free to visit https://www.spatialreference.org.