How to classify data in a map?
Once you have created your project, collected and uploaded your data, you are ready to customize your map! With the help of our Appearance wizard, you can modify the display of a layer based on the values of its attributes.
These operations can be performed based on distinct or continuous values, but you can also manage the classes manually.
Table of Contents
If you are more of a visual learner, feel free to check out the video below.
Classification by attributes based on distinct values
Classifying attributes based on distinct values means that all the attributes that have the same values will be classified into one category. Follow these steps to do it:
- Select and double click a layer to open a Layer properties.
- Click the Wizard button.
- Select the Distinct radio button.
- Select the field whose values will define the layer display.
- Click the Calculate button.
- Click the Save button.
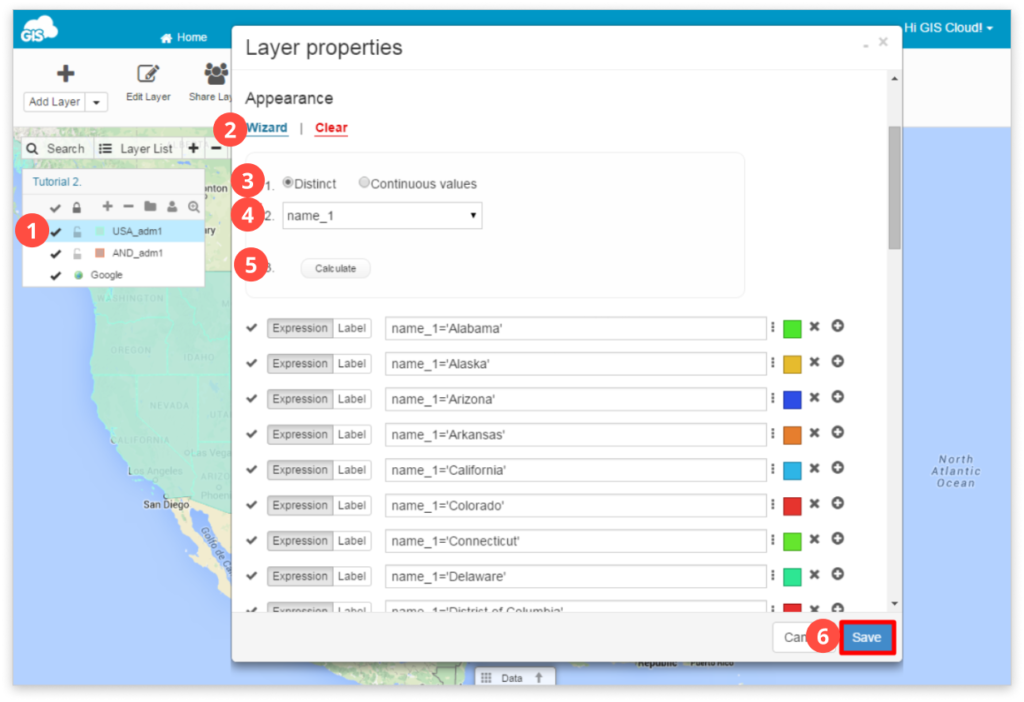
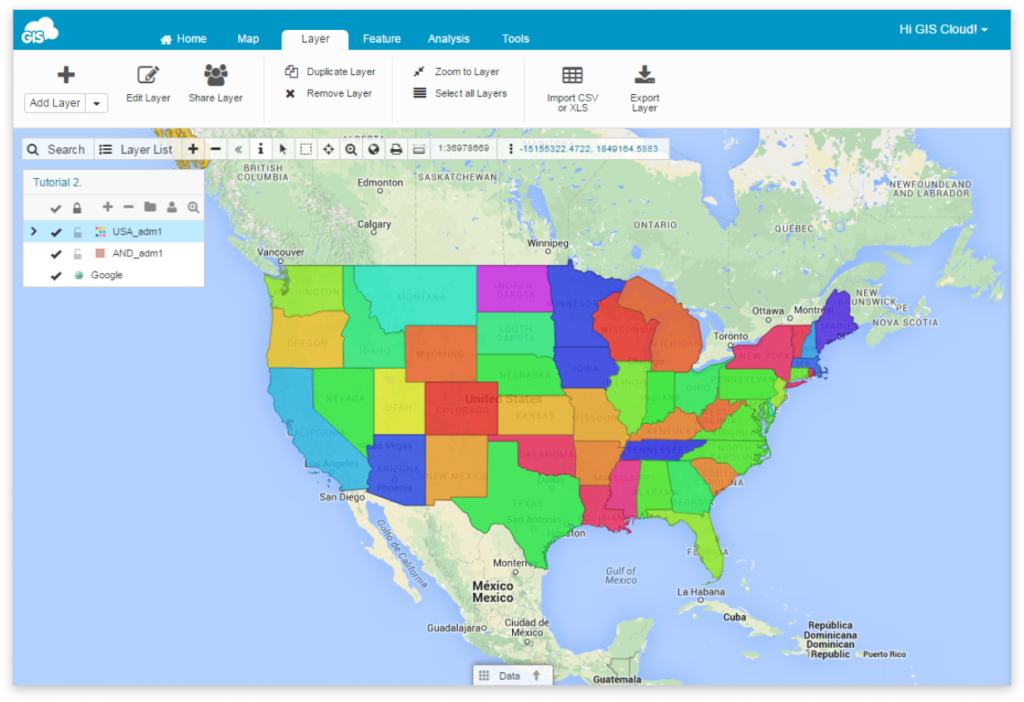
Colors will be automatically defined for the features, but you can manually assign colors to each feature by selecting the appearance box. You can find more information about appearance settings in this article.
Classification by attributes based on continuous values
Classification by attributes based on continuous values means that attributes will be classified into defined range classes that represent a set of values. You can do it by following these steps:
- Select and double click a layer to open a Layer Properties.
- Click the Wizard button.
- Select the Continuous radio button.
- Select a field whose values will define the layer display. Note that the column has to be number type (Integer or Real). Learn more about column types here.
- Choose the number of ranges that are to be defined, minimum, and maximum field value.
- Choose Calculate.
- Click Save.

Colors will be automatically defined for the features, but you can manually assign colors to each feature by selecting the appearance box. You can find more information about appearance settings in this article.
Manage classes manually
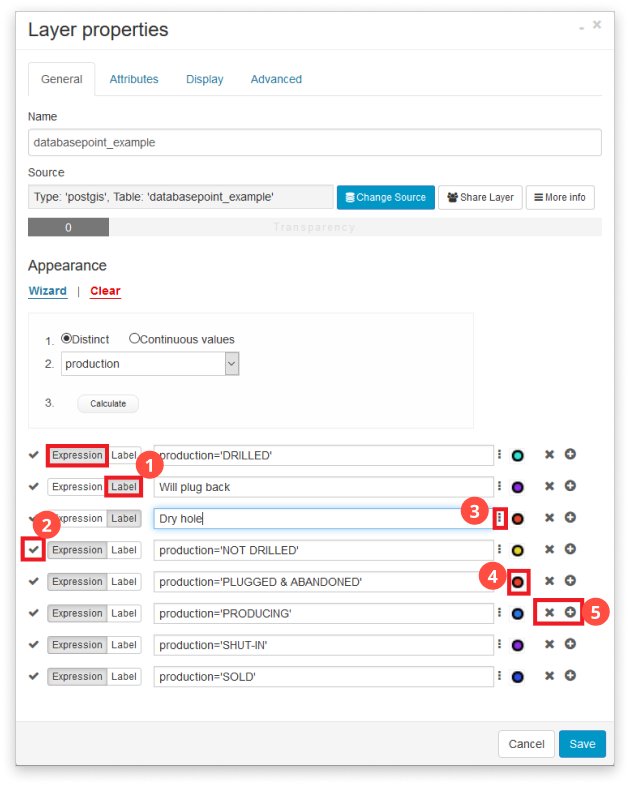
Learn how to manage classes by following the instructions below:
- You can manually set an expression or add a label that will be displayed in the Layer List.
- Expression is an automatically generated field that contains information for each class. You can edit class values but make sure that there are features that satisfy the condition.
- Label is the class name visible in the Layer List. Label editing will not affect data in a layer, only class name.
- Set category visibility.
- Hold the mouse button to drag the expression to a different position.
- Select Appearance to change the defined symbol. You can find more information about appearance settings in this article.
- Remove or add expressions.
Supported operators
It is possible to use multiple operators to combine more expressions into one.
Here is the list of supported operators:
- OR – any of the expressions have to be satisfied
- AND – all expressions have to be satisfied
- XOR – exclusive or – one of the expressions has to be true and the other one has to be false
- NOT – none of the expressions have to be satisfied
- > – greater than
- < – less than
- != – indicates inequality
- >= – greater or equal
- <= – less or equal than
- = – equals
- IS – equals
- <> – exclude value
- LOG – returns logarithmic value of the expression value
- LN – returns natural logarithmic value of the expression value
- SIN – returns sinus value of the expression value
- COS – returns cosine value of the expression value
- TAN – returns tangent value of the expression value
- POW – returns power value of the expression value
- SQRT – returns square root of the expression value
- ISNULL – display features which don’t have any value
For more complicated classification examples, take a look here!
Troubleshooting
Listed below are some common errors that can occur when classifying your data. You may not recieve any error messages, but the data on your map will not be classified, classes may be missing or all data may be missing or appearing on the map.
- Missing or incorrect qutation marks in the expression, for example: incident_type=littering or incident_type=”littering”, you should use only single qutation marks (‘ ‘)
- Uppercase or lowercase characters in string values – values in your expression must match the value in your table, for example: if the value you are classifying by is “littering”, the expression: incident_type=’Littering’ will not produce a class
- Use of some special characters (for example: |) in the classification may impact the result of the classification. In some cases, the data will be classified on the map, but it may impact other functionalities, for example, setting labels.