Filtering data through the Datagrid
Table of Contents
Datagrid filtering allows you to set simple and complex filters to more efficiently search through the data in your layer (and on your map) and can help you gain more insight into your data.
These filters are used to filter data (the attribute table) based on specific feature attributes. Depending on the data type (text, number, date), you can choose different conditions and even set up more complex expression groups.
For example, you could filter the datagrid to show only assets inspected in the first quarter, concrete electricity poles, or all pipes where a leak has been detected. Look at the complete list of supported expressions below, or check out this guide for practical examples.
How to use the filters
To filter the data, follow the steps below:
- Open the datagrid by clicking the Data icon at the bottom of your map.
- Click on the Filter button in the datagrid (top left).
- To start defining the expression, choose the attribute column you want to filter.
- Select the condition (e.g. ‘contains’, ‘greater than’, ‘equal to’, etc.).
- Choose a value.
- If needed, add a new expression or expression group and repeat steps 3-5. Expressions and expression groups can be combined using the AND or OR operators.
- AND – features will display only if both conditions are met
- OR – only one of the conditions needs to be met for the features to be included
- Once done, click on Apply.
- You have now made a View!
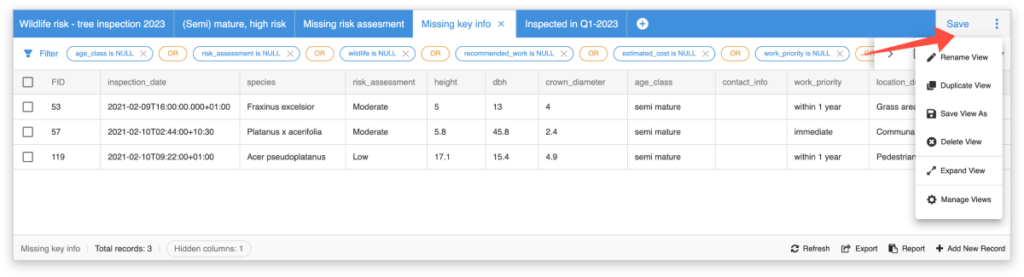
- To save the View for future use, click on the Save button in the top right corner of the datagrid, choose a View name, and click Save.
Note: if you’re creating a more complex filter and you’d like to use both the AND and the OR operator, consider using expression groups where appropriate (see below for some more info on expression groups).
When switching between different views, features on the map will appear or disappear, depending on whether they meet the conditions set in the view expression. If you close a View and wish to use it again, you can open it by clicking on the + icon in the datagrid ribbon. From there, find your View and click on it to open it. Look at the Managing Views section below for more information.
Available conditions
The conditions you can choose in step 3 will differ based on the column type:
- Text fields: Contains, Does not contain, Is equal to (=), Is not equal to (!=)
- Number fields: Is equal to (=), Is not equal to (!=), Is greater than (>), Is less than (<)
- Date fields: choose start and end date, or ‘today’, yesterday, ‘last week’, ‘last month’
Expression groups
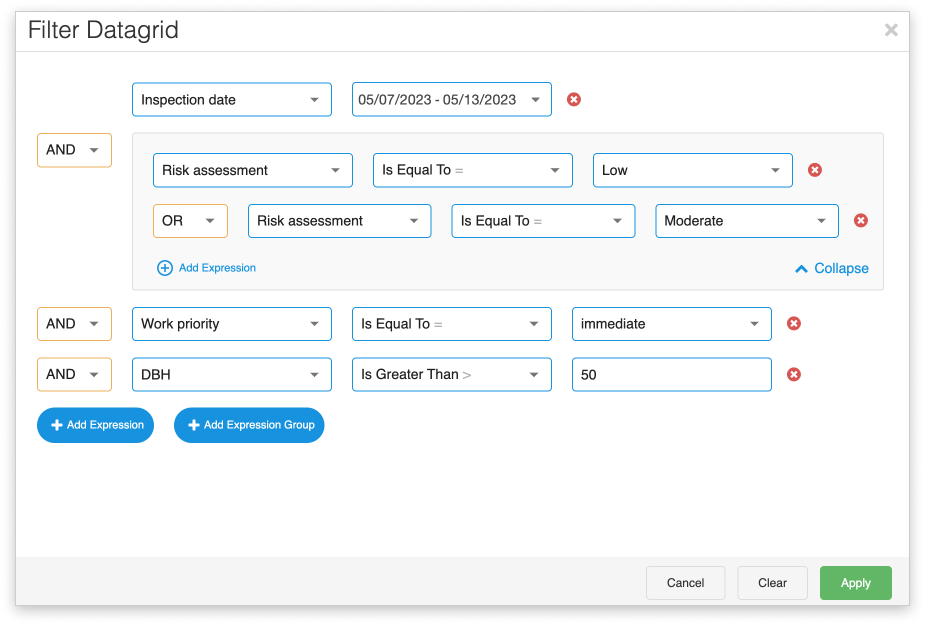
Expression groups can be used to create nested expressions that help create more complex filters, and allow you to fully utilise the AND/OR operators. For example, if you have a tree inventory dataset, you can filter trees that are on public property AND for which the risk potential is high OR very high: (A AND (B OR C))
Expression groups have a light grey border around them to help distinguish between them and singular expressions.
Managing Views
Once you’ve set up an expression, you can save this as a “view” by clicking on the Save button on the right side of the datagrid. Views use expressions (simple or complex) to determine what is displayed in the datagrid and on the map – only the features that match the conditions set in the expressions are visible, while the rest are simply hidden.
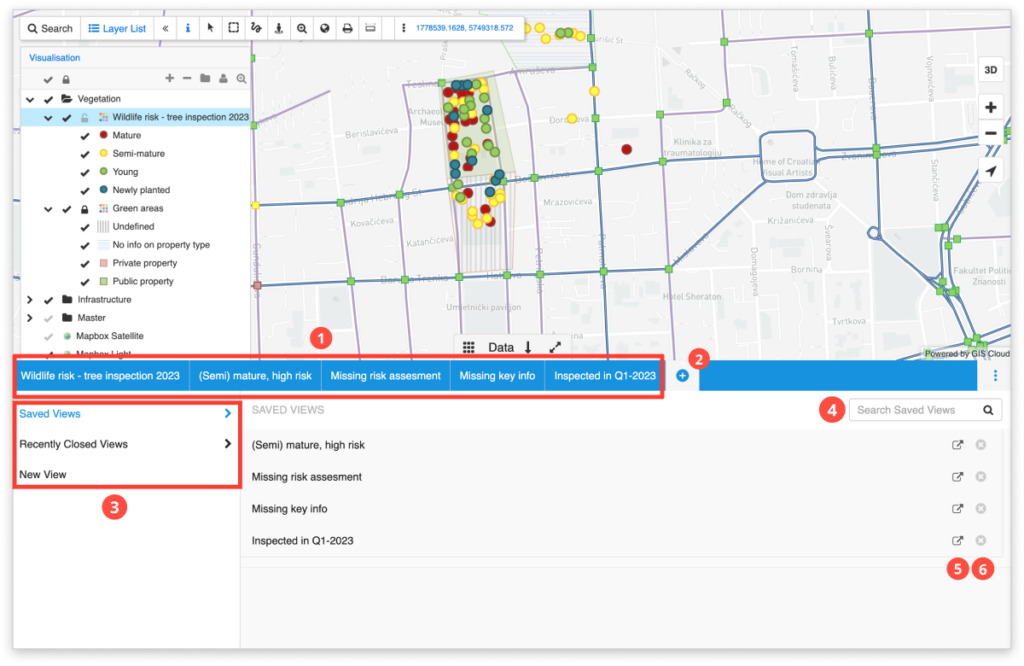
- For each layer, you can have multiple views saved. The first view in the datagrid will always display the full attribute table (i.e. the whole dataset), and the rest are custom views. Close a view by clicking the x icon next to the view name in this section.
- You can add new views and manage existing ones by clicking on the + icon at the top of the datagrid.
- There, you’ll find a list of Saved views and Recently closed Views.
- If you have a lot of saved views, you can use the Search option to find the one you’re looking for.
- Open an existing view.
- Delete a view.
Additional options for each view can be found by opening a view, and then clicking on the three dots at the top right of the datagrid. From there, you can:
- Rename View
- Duplicate View
- Save View As
- Delete View
- Expand View (open the datagrid across the whole screen)