Share your map as WMS
One of the map sharing options you can use in GIS Cloud is also sharing maps as WMS. Get WMS permalink to open your GIS Cloud map on third-party GIS software and share it among your colleagues or clients. Web Map Service (WMS) is a standard protocol for serving georeferenced map images over the Internet. In GIS Cloud, you can share both private and public maps as a WMS.
WMS protocol is limited to sharing only vector and raster layers. Symbology of the layer symbology is preserved as well. Exporting basemap is not supported, which means that basemap won’t be visible in WMS export. Also, note that only TIFF format is supported for exporting raster layers.
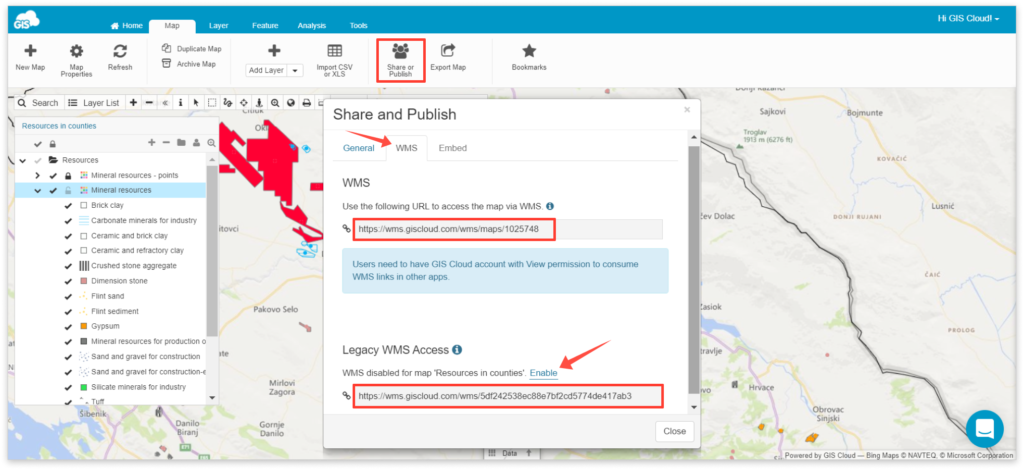
A WMS link is automatically created for all GIS Cloud maps, and the WMS link is available in the Share and Publish window.
Note: If you have used the WMS option before 30/06/2020, you also have access to Legacy WMS. Legacy WMS refers to a unique URL for each user, where all maps with enabled WMS and their layers are available. That means that if you share a legacy WMS link (one link for all maps), any user with whom you have shared this link will be able to see all maps for which the WMS option is enabled. In most use cases, we suggest using the new WMS instead of the legacy one.

To share a public map as WMS, follow these steps:
- Open your map in Map Editor.
- Click Share or Publish button from the Map tab and navigate to the WMS tab.
- Copy and paste WMS URL link to third-party software, i.e., QGIS, Google Earth, ArcMap.
If you wish to share a private map as WMS, follow these steps:
- Open your map in Map Editor
- Click on Share or Publish button from the Map tab and navigate to the General tab.
- Share a map with another user with Can View permission
- Another user can log in to his GIS Cloud account, enter the shared map and under Share or Publish – WMS tab copy WMS URL
- Open third party GIS software, paste WMS URL link and log in with your GIS Cloud credentials (this step might differ slightly based on which software you’re using, but usually they have a place to input your credentials – it’s best to check their guides on adding password protected WMS directly).
Note: if you’re using AGOL and wish to add a private GIS Cloud WMS as a layer, you can use a custom parameter to input credentials, specifically the API key. The parameter name should be api_key, and the value is your API key. You can create a new API key under My Account details (from the top right dropdown in any GIS Cloud app) and selecting the API access tab.
